The Secret to Perfect Beignets: Unlocking Authentic New Orleans Flavor at Home
Imagine the warm, sugary embrace of a freshly fried beignet, straight from the fryer, dusted generously with powdered sugar, and served with a steaming cup of coffee. It’s an iconic New Orleans experience, a moment of pure culinary bliss that transports you straight to the bustling streets of the French Quarter. While the thought of recreating these pillowy, golden squares at home might seem daunting, we're here to reveal the secret to achieving truly perfect, café-quality beignets right in your own kitchen. The magic lies in two crucial elements: an overnight dough and mastering the art of frying. This comprehensive guide will walk you through everything you need to know to make the best homemade beignets you’ve ever tasted, just like they do in the Big Easy.
Beignets are more than just donuts; they are a tradition. These soft, vanilla-scented French-style doughnuts, cut into squares, boast unique crispy corners that many argue make them superior to their circular counterparts. The contrast between the slightly crunchy exterior and the airy, tender interior is simply irresistible. This ultimate guide will demystify the beignets recipe, making it accessible and enjoyable for every home baker.
The Overnight Dough Advantage: Flavor, Texture, and Convenience
One of the most significant secrets to achieving superior homemade beignets, often overlooked in quick recipes, is allowing the dough ample time to rest and develop in the refrigerator overnight. This isn't just a suggestion; it's a game-changer for flavor, texture, and your overall baking experience.
Why Overnight Dough is Essential
- Enhanced Flavor Development: The slow, cold fermentation process allows the yeast to work its magic over a longer period. This develops more complex, nuanced flavors in the dough, resulting in beignets that taste richer and more authentic. You'll notice a distinct difference from doughs rushed through a warm proofing.
- Superior Texture: Chilling the dough overnight helps relax the gluten, leading to a more tender, pillowy crumb in the finished beignets. It also makes the dough easier to handle, roll out, and cut without it snapping back excessively. The cold dough is firmer, less sticky, and more manageable, ensuring those perfect square shapes hold up during frying.
- Convenience & Make-Ahead Benefits: Perhaps the most practical advantage for the home cook is the ability to prepare the dough a day or two in advance. You can mix your ingredients, let the dough rise slightly at room temperature, and then tuck it into the fridge for up to 48 hours. This means you can wake up, take out your dough, and have fresh, warm beignets ready in under an hour, making it perfect for weekend breakfasts or special occasions without the morning rush. The dough actually does a slow proofing in the fridge, eliminating the need for a second, active proofing after chilling.
Tips for Your Overnight Dough
- Chill Time: Once your dough is mixed and has undergone its initial brief rise, cover it tightly and refrigerate for a minimum of 8 hours, and ideally 12-24 hours. You can extend this to 48 hours if needed.
- Bring to Room Temperature: Before rolling and frying, take the dough out of the refrigerator and let it sit at room temperature for about an hour. This step is crucial; it allows the dough to relax further and makes it easier to work with, preventing cracks and ensuring even rising when it hits the hot oil.
- Freezing Raw Dough: If you want to prepare even further ahead, you can cut your raw beignet squares and freeze them. Lay them on a baking sheet, ensuring they don't touch, until frozen solid. Then, transfer them to an airtight container or freezer bag for up to one month. When ready to fry, thaw them on a baking sheet, again ensuring they don't touch, before frying as usual.
Mastering the Fry: Essential Tools & Techniques for Golden Perfection
While the dough provides the foundation, flawless frying is where your beignets truly transform into golden, airy masterpieces. This stage demands attention to detail, but with the right tools and techniques, you'll achieve that coveted crispy exterior and light, fluffy interior every time.
The Non-Negotiable Tool: A Deep-Fry Thermometer
If there's one piece of equipment you absolutely cannot skip, it's a reliable candy or deep-fry thermometer. This isn't just a recommendation; it's essential for achieving consistently perfect results. The reason is simple: oil temperature is paramount.
- Consistent Cooking: Beignets require a specific oil temperature, typically between 350°F and 375°F (175°C-190°C). If the oil is too cold, the beignets will absorb too much oil, becoming greasy and dense. If it's too hot, they'll burn on the outside before the inside cooks through, leaving you with raw dough and a bitter crust.
- Perfect Texture: Maintaining the correct temperature ensures even cooking, allowing the beignets to puff up beautifully and develop that signature airy interior and crispy golden-brown exterior.
Choosing the Right Oil
Select an oil with a high smoke point and neutral flavor. Good choices include:
- Vegetable oil
- Canola oil
- Peanut oil
- Grapeseed oil
Avoid olive oil or butter, as they have lower smoke points and will burn quickly, imparting an unpleasant taste to your beignets.
Frying in Batches: The Golden Rule
One of the most common mistakes home fryers make is overcrowding the pan. Resist the urge to fry too many beignets at once. Frying in small batches is critical:
- Maintain Oil Temperature: Dropping too many cold pieces of dough into the oil will drastically lower its temperature, leading to greasy, undercooked beignets.
- Even Cooking: Frying in batches ensures each beignet has enough space to cook evenly and puff up without sticking together or steaming instead of frying.
- Easy Handling: It's much simpler to manage and flip a few beignets at a time, ensuring they cook to a perfect golden hue on all sides.
Safe Frying Practices
- Use a Sturdy Pot: A heavy-bottomed pot, like a Dutch oven or a deep cast-iron skillet, is ideal for frying. It retains heat well and provides enough depth to prevent oil splatters.
- Don't Fill Too High: Fill your pot no more than halfway with oil to prevent overflow when the beignets are added and expand.
- Never Leave Unattended: Hot oil can be dangerous. Always stay in the kitchen and monitor the oil temperature while frying.
- Have a Fire Extinguisher Ready: For any deep-frying, it's a good safety measure to have a Class K fire extinguisher nearby.
From Dough to Delight: Step-by-Step Preparation & Pro Tips
Now that you understand the fundamental advantages of overnight dough and the precision required for frying, let's look at the practical steps to bring your beignet dreams to life.
The Dough – A Simple Foundation
The base for a classic beignets recipe typically involves a simple yeast mixture, evaporated milk for richness, eggs for structure, shortening or butter for tenderness, flour, and a touch of sugar and vanilla for flavor. Combine these ingredients to form a soft, slightly sticky dough. Resist the urge to add too much flour; a slightly tacky dough is key to an airy beignet. Knead gently until smooth, then proceed with the overnight chill.
Rolling and Cutting
- Prepare Your Surface: Lightly flour your work surface.
- Roll Evenly: Gently roll out your chilled, room-temperature dough to an even thickness, typically about ¼ to ½ inch. Uniform thickness ensures uniform cooking.
- The Pizza Wheel Hack: A pizza wheel is your best friend for cutting beignets. It makes quick, clean cuts. Don't stress about perfect uniformity; the rustic, homemade look is part of their charm. Cut the dough into roughly 2-3 inch squares.
- Prepare for Frying: Have a platter or baking sheet ready, lined with parchment paper, to place your cut beignets before they hit the oil.
The Frying Process
- Heat the Oil: Heat your chosen oil in a heavy-bottomed pot to 350-375°F (175-190°C), monitoring with your deep-fry thermometer.
- Fry in Batches: Gently slide 3-4 beignets into the hot oil. They should immediately start to puff up and sizzle.
- Flip for Even Cooking: Fry for about 1-2 minutes per side, or until deeply golden brown and puffed. Use tongs or a slotted spoon to carefully flip them.
- Drain Excess Oil: Once golden, remove the beignets with tongs or a slotted spoon and place them on a wire rack set over a baking sheet lined with paper towels. This allows excess oil to drain off, keeping them light and crisp.
Beyond the Fryer: Serving Your Authentic Beignets
The final step in your beignet journey is just as important as the first: serving them correctly. This is where the magic of New Orleans truly comes alive.
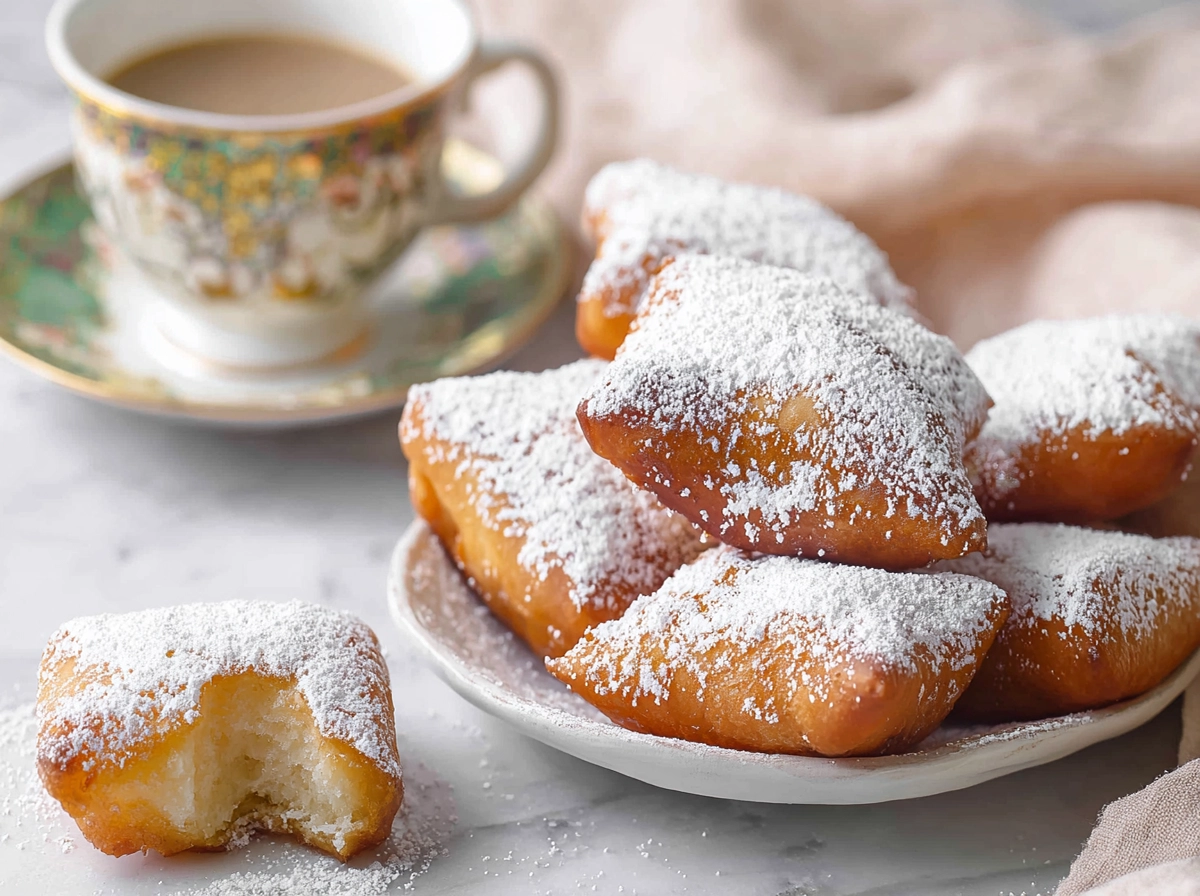
The Powdered Sugar Snowfall
Tradition dictates that beignets are showered generously with powdered sugar. There’s no such thing as too much! Recreate that iconic Café du Monde experience:
- The Sneeze Factor: Place your freshly fried, still-warm beignets into a paper bag (or a large bowl) with a generous amount of powdered sugar. Shake vigorously. Or, for a more delicate touch, simply dust them through a fine-mesh sieve. Just remember, as the old New Orleans adage goes, if you're not coughing up powdered sugar, you're not doing it right!
Serve Immediately
Beignets are at their absolute peak of perfection when served warm, ideally within minutes of coming out of the fryer. Their light, airy texture and delicate crispiness are best enjoyed fresh. They lose some of their charm as they cool, so gather your friends and family around!
The Perfect Pairing
Complete the authentic New Orleans experience by serving your homemade beignets with a hot cup of café au lait, a rich coffee with chicory and steamed milk. The slight bitterness of the coffee beautifully complements the sweetness of the beignets.
Making homemade beignets is a truly rewarding culinary adventure. By embracing the secret of overnight dough for superior flavor and texture, and diligently mastering your frying techniques with a thermometer, you're well on your way to creating an unforgettable taste of New Orleans in your own home. This comprehensive beignets recipe is more than just instructions; it’s an invitation to tradition, a guide to joy, and a promise of deliciousness. So, roll up your sleeves, chill that dough, and get ready to experience the perfect beignet.
